
We investigate the simulation of fire via virtual simulation using two-dimensional Navier-Stokes equations in order to have the fire emulate a fluid. We host our simulation on a local server and use three.js and WebGL to present and simulate the fire using the Navier-Stokes equation. With these technologies, we are able to change the first according to many physical principles present in the Naiver-Stokes equation, such as viscosity, air speed, burn rate, and swirl. Additionally, our project is able to present and adapt the fire to a range of multiple situations, such as using the fire to emulate a volcano’s lava and heat or emulating the smoke produced by a cigarette.
The initial proposal for our project was to simulate a fire. This topic was chosen due to the abundant presence of fire within video games and general effects in other medium like movies. There are many ways to represent fire (as seen below), which fit a multitude of scenarios. Since some of the members in the project are interested in game development, we thought it would be an interesting task to simulate a fire from what we learned in the class. Therefore, our original plan was to dedicate the first two weeks to learning OpenGL and try to apply whatever physics we would need in OpenGL. From there, we would dedicate the next week to being able to render the fire and add shaders, colors, or whatever else was necessary to bring to life a basic fire rendering. The last week would then be dedicated to cleaning up our code and presentation, while also making our rendering more complex if possible.
Through our research we found out that fire can be simulated using a particle system with fluid dynamics. We discovered that fluid motion in nature can be modeled through the Navier-Stokes equations. Though they are very hard to solve analytically, if we simplify it and go for a simulation that looks convincingly realistic it is much easier. We based the physical model off the Navier-Stokes equations below.
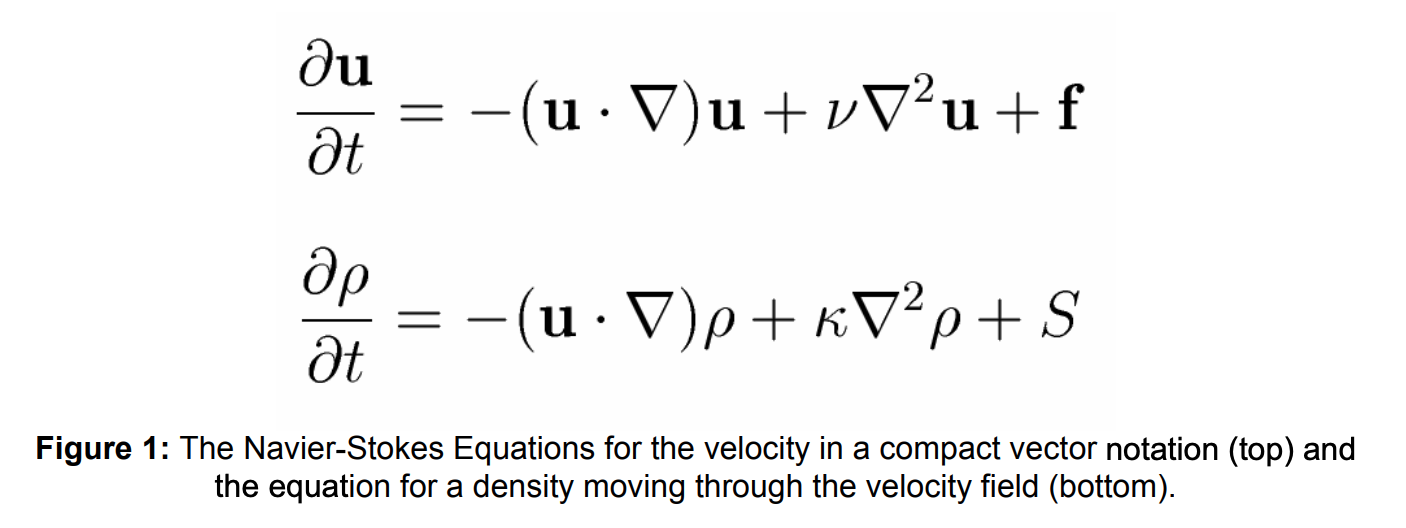
The equations are made of many components which ultimately yield a velocity field vector. Firstly, u represents the initial velocity vector field. A velocity vector field is a function that defines the velocity at each point in space, telling the point where it will move to next. u can be user defined and is influenced by the presence of heat sources, air drafts, etc. delta is defined as the divergence which measures the change of density of a fluid flow, give the vector field above. The way we solved for the movement of density is outlined in the image below.
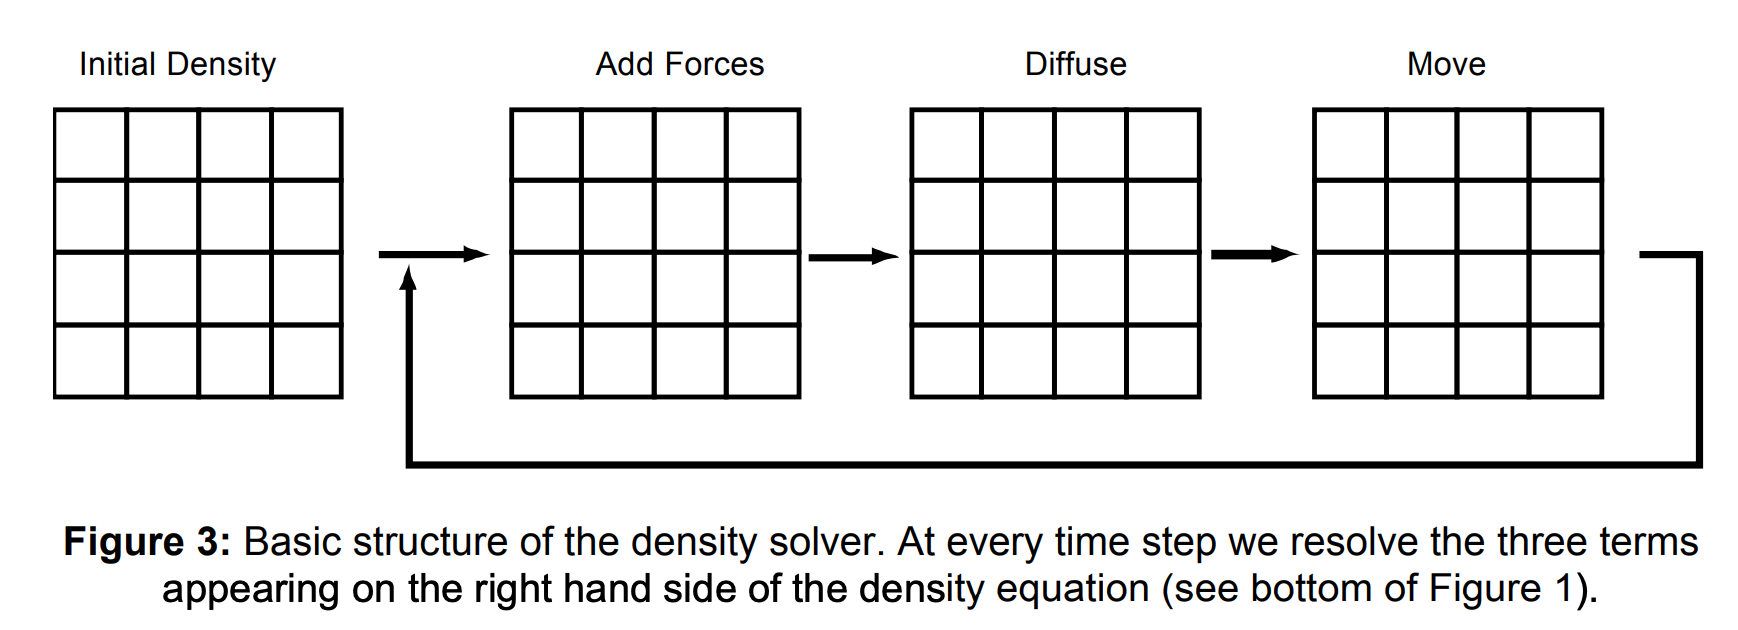
We start off with some set density field describing the density in point in space. At each time step we apply any external forces that may change the density (drag, expansion, swirl, etc.). Then, we account for diffusion, the rate at which points exchange density with its direct neighbors. Finally, we set the new density at each point in space to the output of this movement and start again in the next time step. v represents the viscosity of the fluid which is how thick/sticky it is due to internal friction. f is any external forces acting upon the fluid like wind. p represents the pressure present in the system. By solving for each of these parts, we can create a vector field for each discrete time step to simulate the movement of fluid.
In order to implement our algorithm above, we decided to using three.js in order to simply the use of WebGL. three.js gave us an easy framework to interact with WebGL, which allowed us to implement the physics and create the shaders we needed. Our general approach involved two files: index.html and fire.js. In index.html, we set up user configurable parameters in the GUI. The user is able to change the diffusion rate (which changes the density solver), the viscosity, expansion/swirl/drag rate (which changes external forces acting upon density), airspeed/direction of wind in x and y direction/speed (which are external forces acting upon the fluid), and color1/2/3/color bias/burn rate (which affect the color shader). index.html handled all the frontend code to render the fire in real time and allow user control.
The algorithm itself was handled in fire.js where we could implement the physics of the system. Initially, we were going to create a 3D fire simulation using particle systems, but that approach became too convoluted for our time frame so we decided to simplify to a 2D fire simulation using a cell-based approach. The cell-based approach was based off of the diagram below.
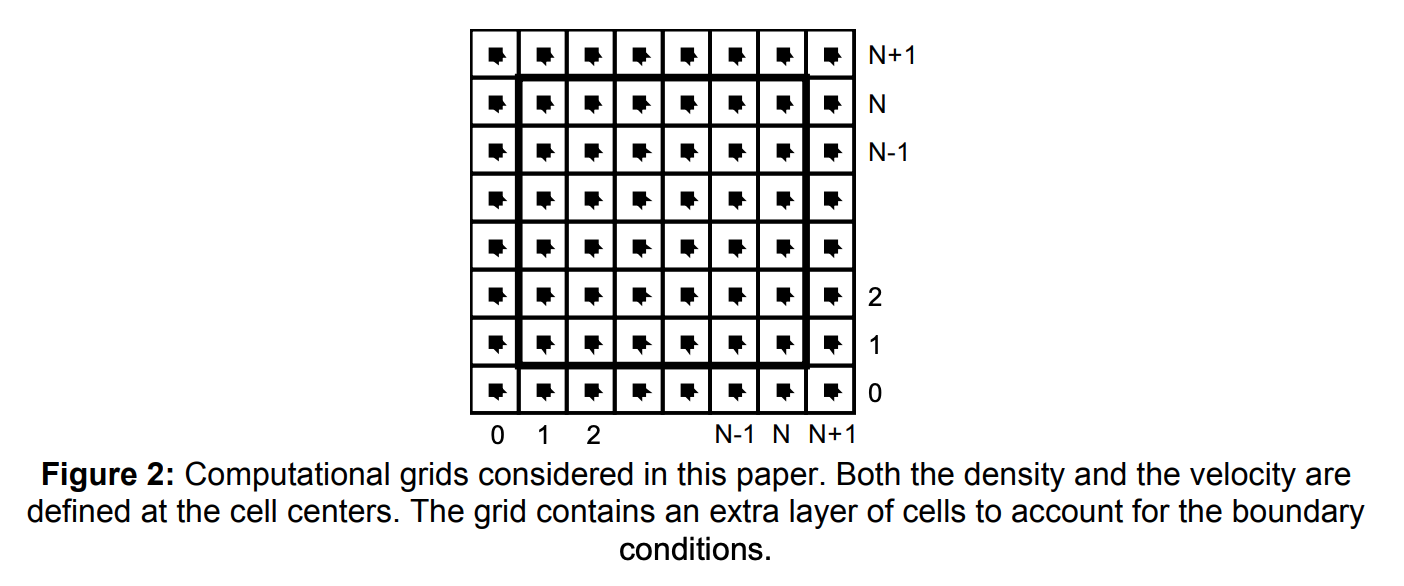
By basing our data structure off of the computational grid above, we can store both the velocity and the density for each point in space. This allows us to easily apply a velocity field and the density field on top of the grid and compute the new velocity/density for each cell. We played around with how large our grid should be. In order to find a medium between aesthetics and computational intensity, we decided to go with a 512 x 512 grid in order to achieve a good fps rate (~30fps) while also looking visually pleasing.
After setting up how we store each cell of the fluid, we looked for ways of implemented the Navier-Stokes equations onto it. We used vertex and fragment shaders since vertex shaders allowed us to move around the position of cells (applying vector fields) and fragment shaders allowed us to color each cell (determining the color of the fire). We set up four different shaders in a pipeline. Firstly, a source shader that applies all the initial physical properties like the initial velocity/density fields onto the computational grid. Next, a diffuse shader which handles solving for the density using the diffusion rate, viscosity, expansion/swirl/drag/burn rate. Much of the mathematics used to solve for density was based off of Real-Time Fluid Dynamics for Games. Then, a drift shader that applies any external forces onto the fluid using the air speed and a wind vector composed of the wind x and y components. We could have expanded this shader to add on other external forces like user input if time permitted. Finally, we used a color shader to determine the color of each cell based on the 3 colors the user picked and a color bias that determines how to interpolate between the colors.
We faced a couple of problems along the way. The first major problem we ran into was our inclusion of OpenGL in our project. It took us nearly a week to understand how to use OpenGL and we still struggled heavily with simply using and understanding OpenGL enough to employ basic physics principles like Navier-Stokes. We ended up resolving this issue by use three.js and WebGL as an alternative. WebGL as a simpler software was easier for us to understand, especially when it came to our shader implementation. This also turned out for the better since once we included three.js, we realized that it would be difficult to include a particle-like fire simulation, so many of the perks of using OpenGL instead of WebGL (like geometry shaders and 3D textures) became redundant to us.
The next major problem we ran into was creating the fire itself. Despite many of the papers we referenced referring to Navier-Stokes as the method by which we could simulate the fire we struggled a lot with making the fire seem realistic. We resolved this in the aforementioned manner of treating the fire like a liquid and having the base be a circular like object. As a result, we decided to simplify our implementation to look similar to some simulations we had seen (see Navier-Stokes Fluid Simulation with Obstacles and Splat-based Fluid Simulation using Navier-Stokes), where the base has a static amount of base "liquid" or "fire" come up and which we can use to produce the remaining fire and fluid-like smoke using Navier-Stokes. This also avoids the heavier requirements of having implementations of bitmaps and applying vector fields to each and every particle that could be produced by our fire (as referenced in Imperial College of London Paper on Particle Fire Simulation). We attempted these at some point in our last week but ran into issues almost immediately and so decided to drop it in order to turn in our project on time.
Outside of those two, we didn't really run into any major issues with our project but there were certain things that we were unable to accomplish due to the difficulty of implementing them. As mentioned above, we were unable to implement a particle-based fire setup but along with that we weren't able to fully implement a 3D setup for our fire, as well as being unable to use our shaders to cleanly transition between colors as the smoke/fire grew (i.e. how the color changes the further up the fire you go). We decided these were very complicated and could be reserved for future exploration with the project.
The biggest lesson we learned is that physics is hard. It is very hard to represent any physically occurring mechanic on a computer. It is an intersection of mathematics, physics, and computer graphics -- requiring an expert in each field to successfully simulate something accurately. Despite not having experts on our team, we did have a lot of success researching other expert's findings on the field. There were a lot of resources online for us regarding fire simulation and fluid simulation.
Another thing we learned was that translating physics and math to code is hard. We found out it is our job as computer science students to be able to use our findings and convert it to code. There were a lot of hard choices we had to make: choose an efficient data structure to store the fire, how to write shaders that represent the physics, and how to structure our files. What we got out of it is that it requires a lot of planning. Computer science isn't all about coding, a lot of it is about what you do before you code. You need to do a lot of research, plan out how to structure your code, and make some hard choices on how to implement what we researched. Luckily, there was three of us to bounce ideas off of and arrived at a product we were satisfied with.
Finally, we learned that learning new things is hard. We wanted to first start out using OpenGL to create the project just like how all our class projects prior using OpenGL. This requires a huge amount of setting up code and understanding the full graphics pipeline to do successfully. Since we didn't have all the time in the word to research and understand this technology, we decided to adapt and convert to WebGL. WebGL was significantly easier since it simplified a lot of what OpenGL does, since it runs on less resources; however, WebGL was still very convoluted since it had a lot of moving parts it required. Through further research, we found three.js, a JavaScript framework that uses WebGL to create and display animated computer graphics. We were able to find an abstraction layer we were comfortable working with to accomplish our goals. Ultimately, we learned that working in a team requires a lot of adaptation. We needed to adapt to different technologies to reach our goal while also playing off of each other's strengths and accounting for our weaknesses.
Below, we can see an example of how we can influence the physics in the simulation using the GUI we built. We're able to adjust whatever aspect of the Navier-Stokes equation or the physical situation we'd like by increasing or decreasing our desired value via the sliders. Certain values in the GUI are specific to how the flame (or smoke/other materials depending on what we want to simulate) will move. For example, when we toggle our viscosity, we can see that our flame is significantly wider or narrower and looks like it is burning more rapdily, respectively. Our expansion factor has a similar effect, changing how large our flame will be (i.e. how tall it can grow). On the other hand, we have other values that allow us to change the presentation of our flame (e.g. color). Values like color bias allow us to change how much color saturation will remain from the origin of the flame at the base and how much is left at the top, depending on what colors are set. Other values like burn rate also contribute to this and how much our flame burns dictates how much of the primary color of the flame will continue upwards in our simulation. Here's an example of the toggles below:
 |
 |
 |
 |
 |
 |
 |
 |
Additionally, included are some specific built in scenarios that allow us to easily transition between different sets of values and colors so that the fire can be represented in multiple ways. This feature was included to show the versatility of our simulation and that it can be generalized to multiple situations depending on what's needed. Each of these can be achieved by setting the sliders to certain values (and as a result, we can include many more built-in scenarios), but they give us a great reference point to what is possible with our Navier-Stokes fire simulation:
|
Julian Cervantes: Provided a majority of our research on the topics and finding examples for us to learn fluid and fire simulation through. Created a lot of the final presentation and coding aspects used in our final project (especially the incorporation of GUI and how we changed our display for the project, both for scenarios and physical variables).
Dalton Do: Leader of the group, who helped manage a lot of the major coding in both three.js and WebGL as well as contributing a lot to planning the project. Was able to translate the physics to the desired WebGL format and produced the basis of the eventual look for the final project (both in WebGL physics and three.js rendering of the fire).
Ayush Maganahalli: Completed most of the work in both of the videos presented through the course of the project (the checkpoint and final videos). Helped contribute to the incorporation of the physics in the WebGL and general understanding of the physics for the members of the group. Provided general understanding of three.js software.
TAs: Thank you to all the TAs who helped us with our project and throughout the semester! Special shout out to Vivien, Jose, and Xiling for helping us with the class and being our go-to TAs!
Professors Lastly, thank you to Professors Ragan-Kelly and Ren for all the work they put in this semester and having such a great final presentation system! We had a lot of fun with our project and it was a great time presenting to you. We are extremely grateful for all the encouragement and guidance you've given us this semester, both for our project and future endeavors in graphics!